Sunday, August 22, 2010

Yes, I can!


After our visit to the fabulous farmers' market in Madison, Wisonsin last weekend, visions of vegetables and fruits have been dancing in my head ever since. Probably because such beautiful bounty of summer will not be available for much longer, the result has been a strong urge to purchase every fresh fruit and vegetable I now come across. A trip to our local grocery a few days back found me grabbing up produce with reckless abandon. Which then begged the question of what to do with the current abundance of the season's wonderfully fresh produce before the quality goes down and the prices go up. The answer I came up with? Can it.

The canning idea first ran through my head when, on the the flight home from Wisconsin, I happened to read a lovely little magazine article about a recent surge in the popularity of pickled vegetables and condiments on restaurant menus across the country. The urge to can got stronger a couple days later, when a newspaper feature on canning fresh tomatoes caught my eye. Once I saw a hardware store flyer advertising a sale on canning items, I was hooked.

Never mind that aside from the standard hamburger dill chip we rarely eat anything that's pickled. Disregard the fact that I have never canned anything before in my life. Overlook that it's hot and muggy outside, that we have no central air, and that my kitchen is the size of a small walk-in closet. Forget about all of these practical matters, as I certainly did two days ago, when I decided that I was going to spend the weekend standing for endless hours over a hot stove, pickling and canning an assortment of fruits and vegetables.

And can I did! After teaching myself a few basics through some quick Internet research and then hitting Walmart for canning supplies, the project began with fresh green beans, which I canned in a brine infused with spicy cayenne pepper.


Because the local peaches were at the height of their summer glory, I could not resist making a batch of brandied spiced peaches (although prepping the fresh fruit was really the pits, bad pun totally intended).


Wanting something easier after the peaches, I next prepared a hot and sour pepper relish recipe that I found in one of my cookbooks, and then I ended my canning marathon by making dilled pickled baby carrots.

My initial canning experience now over, I can report that the process was far simpler than I had imagined, although some extra counter space and a friend to help out would have made it go much more efficiently. What I am not able to report on, at least not yet, is the actual taste of anything I preserved, as all the recipes I made need to sit at least a couple of weeks to let the flavors develop.

Until we crack open the first jar or two, I will just continue to take simple delight in gazing at the tidy rows of home canned goods now lining my cupboard shelves. Yes, just because I can.

Saturday, August 21, 2010

Pucker up!


The August issue of Southern Living arrived about a month ago and, ever since, has been staring up at me from the top of the magazine stack on our family room coffee table. Or, perhaps more accurately, I have been staring down at it, because I cannot seem to take my eyes off of the luscious looking lemon pie featured on the cover.

Inside the magazine are actually two recipes for chilled lemon pie, one for a pie made from scratch and the other for a shortcut, no-bake version, both of which sound delicious. After drooling for days over the thought of a creamy and tart citrus filling in a sweetened graham cracker crust with a whipped cream topping, I finally decided last week that we simply had to have one of those pies, or something close to it. We had a get together planned with friends for Tuesday evening, and that seemed like the perfect excuse to make a dessert during the week.

Because our fridge already contained a couple fresh limes and a large bottle of lime juice, my next thought was that our pie would be a lime one, instead of lemon. Then, after reviewing the list of ingredients and reading that one of the pies had a cheesecake-like texture, I suddenly could not get the idea of cheesecake out of my head. I also began thinking about a fabulous piece of Key lime cheesecake that Scott and I had wolfed down a couple years back at the Cheesecake Factory. From there, it seemed rather obvious that what I really needed to make was a lime cheesecake.

I lacked a recipe for such a thing, but did possess my mother's tried and true recipe for regular cheesecake, which I hoped could be tweaked to result in the lime-flavored concoction I desired. After a quick trip to the store to gather the necessary ingredients, I set about attempting to create a new dessert. I followed the cheesecake recipe I had made so many times before, but substituted a healthy dose of lime juice for the small amount of lemon juice specified in the original recipe, and then also dribbled a little food coloring into the batter to achieve a pale green tint.

Sadly, once the cheesecake came out of the oven, it looked less than impressive. The center had fallen, the crust had cracked, and the color was a bit uneven.


However, a nice thick coat of whipped topping and a little lime garnish helped hide the cake's cosmetic flaws (and, thankfully, I was serving it to very, very dear friends - friends of the sort whom would never judge one by their culinary disasters, of which there have been more than a couple over the decades of our friendship).


When we dug into the cheesecake the following evening, it turned out that the new recipe was an overall success. The lime flavor was perhaps a tad too pronounced, and I have scaled back the quantity of lime juice in the recipe below. Upon making that small adjustment, this recipe should yield a truly wonderful cheesecake, with the slightly tart flavor of the creamy filling providing a deliciously balanced contrast to the sweet graham cracker crust and whipped cream topping.

That's the good news. The bad news is, lime cheesecake notwithstanding, I still cannot get those Southern Living lemon pies out of my mind.

Lime Cheesecake

1/2 cup butter, melted
2 cups graham cracker crumbs
1/2 cup sugar

Combine melted butter, crumbs and sugar, and then pat firmly into the bottom and up the sides of a 10-inch springform pan.

16 oz. cream cheese, softened to room temp
14 oz. sweetened condensed milk
3 eggs, well beaten
1/2 cup lime juice
1/4 teaspoon salt
green food coloring, if desired

2 to 3 cups sweetened whipped cream or whipped topping

Beat together the cream cheese, condensed milk, eggs, lime juice, and salt. If desired, add a few drops of food coloring until batter is a very pale green. Pour mixture into the prepared crust. Bake 45-50 minutes at 300 degrees, or until the cake springs back when touched. Cool to room temperature and remove from pan. Chill cake. Prior to serving, spread top of cake with sweetened whipped cream or whipped topping, garnish as desired.

Sunday, August 15, 2010

Mad for Madison

A business matter required my presence in Madison, Wisconsin for a few hours last Friday. Having never been there, but having heard great things about the city, I rather easily convinced Scott to ditch work on Friday and to come along for a quick weekend visit. We flew up early on Friday and flew back Sunday morning, an itinerary which, after my meeting on Friday, did not leave us much time to explore the area.

While our stay there was brief, it was more than long enough to figure out that we absolutely adore Madison. I seriously cannot sing the praises of the place high enough. Madison is attractive and clean, easy to get around, and the people of that city are the friendliest group of local citzenry that we have ever encountered in our travels.

Sandwiched between two gorgeous lakes, the downtown area is situated on a skinny strip of land, which then widens as one drives further from the city's center. Madison, or "Mad City" as it is affectionately known, is big enough to be interesting but not so big as to be intimidating to first time visitors. The whole place gives off the welcoming vibe of a small midwestern town, but with the slightly artsy and totally funky-cool edge of a much larger city.

Once my business obligations were concluded, we wasted no time in getting to know the city. The highlight of Friday evening, and a must-do for any Madison visitor, was a stop at the Great Dane Pub downtown. This cozy brewery and restaurant offers about a dozen specialty beers on tap and a huge menu of dining options. For us, the food choice was simple, as we knew we had to try the brat and bacon pretzel burger. Aptly described as the flavors of Wisconsin in a sandwich, the giant burger consists of grilled patties of both beef and bratwurst, topped with caramelized onions, applewood smoked bacon, and cheddar cheese, served on a soft pretzel roll . The Food Network recently named it the best burger in Wisconsin and, after tasting one, we have no doubts why.


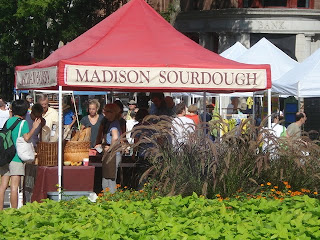
Come Saturday morning, we first hit the weekly farmers' market held downtown on the treelawns surrounding the capitol building. There, we strolled leisurely amongst the gathered crowd, oohing and awing over the items for sale at the various tents and stalls.

We quickly devloped farmers' market-envy, wishing our hometown summer market was something like Madison's. There were breads and other baked goods straight from local ovens...


and all sorts of fresh cut flowers and plants for sale.


As with most farmers' markets, the real highlight was the huge variety of vegetables, fresh from the dirt and displayed on each vendor's stand in mounded heaps of fabulous color.


Last, but far from least, was the selection of local Wisconsin cheeses.


After one full pass through this amazing market, we decided to ponder what to purchase for our lunch while we toured Wisconsin's historic and now beautifully restored capitol building. We had read that the capitol in Madison is one of the most lovely in the country and, while we have not seen them all, we certainly have to agree from our own experience.


The capitol is an imposing structure, built of gleaming white granite and topped with a massive dome on which stands a graceful bronze statue called "Wisconsin".


Inside, the capitol was even better. Painstakingly renovated over a fourteen year period and completed in 2002, the interior features gorgeous polished stone floors with intricate mosaic inlays, sleek green marble Corinthian columns accented with rich gold leaf, soaring vaulted ceilings and arches throughout, period lighting fixtures and other hardware, elegantly carved stone pediments and moldings, all crowned by beautiful painted murals and then the glorious sunlit dome.


The building is truly something to see, and we also loved that there is a rooftop terrace providing great views of downtown Madison and the surrounding lakes. All the more amazing (and a tribute to the spirit of the Wisconsin people) is the fact that, in this paranoid post-9/11 world, all doors to the building stand open all day, with no metal detectors, no need for visitors to present I.D. or otherwise be screened, and no appreciable security presence. The state of Wisconsin quite clearly takes "of the people, by the people, and for the people" to heart, and we thoroughly enjoyed our capitol tour.

Stomachs growling, we made another pass through the farmers' market, purchasing a small round loaf of onion dill rye bread from the Silly Yak Bakery and Bread Barn, and two kinds of cheese (a pungent pesto and sundried tomato Havarti and a mild Colby) from Forgotten Valley Cheese. Needing a place to sit and eat, we walked two blocks to the Monona Terrace and Convention Center. Perched right on the edge of Lake Monona, this modern white structure was designed by Frank Lloyd Wright and has a wonderful rooftop garden and sitting area. From there, we took in the great views in all directions while we lunched on our delicious bread and cheese.


After spending that time downtown, we hopped in the car and drove just a couple miles northeast to the Olbrich Botanical Gardens. These gardens, which are free to visit, totally blew us away. Considering the price of admission, we did not exactly expect to be wowed, but it turned out that this botanical garden is one of the best we have ever seen. Sprawling over 15 acres of land, the gardens are beautifully planned out, impeccably maintained, and contain a huge variety of gorgeous trees, plants and flowers, garden structures and water features.


Once done at the botanical gardens, we were startled to realize that it was only mid-afternoon, after what already seemed like a full day. Not exactly sure what to do next, a quick check of our guide book and map led to the decision to drive thirty miles west of the city to Springreen, the heart of Wisconsin's "Frank Lloyd Wright country."

That decision resulted in a great little side excursion through the farmlands surrounding Madison, which are dotted with charming small towns every few miles. While we arrived at the Frank Lloyd Wright visitor center too late for a tour of the architect's nearby masterpiece, Taliesin, the drive there and back was wonderful. We took in the scenery, visited a couple of quirky antique shops and, on the way home, made a pitstop in the tiny town of Cross Plains. There, we ended our day by enjoying cold beers on the patio of a local tavern, served alongside a basket of deep fried white cheddar cheese curds, another madatory snack when visiting Wisconsin.


Our Sunday morning flight home to Ohio came all too quickly. We would love to go back to Madison for another visit, something I have been babbling about nonstop since we returned. The flight between Ohio and Madison is a super quick three hours airport to airport trip (the three hours even including a plane change in Chicago), which makes it easy to do in a long weekend. While Scott has vetoed my suggestion that we spend a weekend there every month (the veto being for rather obvious reasons but, still, what a killjoy), I am still quite certain we will return to Madison sooner rather than later. We are indeed mad about Mad City, and cannot wait to go back.

Wednesday, August 11, 2010

This is not your mother's broccoli, Mr. President

Broccoli. It seems that people either love it or hate it. Those in the former category know that those in the latter are truly missing out on a very good thing. The haters, on the other hand, cannot begin to comprehend how anyone can stomach the stuff, much less enjoy it. The most famous hater of all, of course, is George H.W. Bush, who pulled serious rank when he announced that, as President of the United States, he was refusing to eat broccoli, having hated it since his mother forced him to eat it as a child.

Having loved the vegetable myself since childhood, my personal theory (with all due respect to the memory of Grandma Bush) is that those who feel compelled to malign broccoli have simply never eaten it properly prepared. Served raw, this staple of veggie platters can indeed be bitter and dry at times, even if slathered in dip. When cooked, just the briefest over-exposure to heat turns broccoli mushy and tasteless, while further overcooking renders it downright slimy and gross.

Thankfully, among my own mother's many culinary talents has long been the ability to fix and serve broccoli in any number of wonderful ways, and we grew up eating (and enjoying) it frequently. Lightly steamed, it tasted great on its own or mixed in with other cooked vegetables like carrots and cauliflower. Tiny pieces of it raw, always super crisp from the fridge, would show up in fresh tossed salads. Occasionally, we were treated to it after a quick roasting in the oven, served with a creamy cheese sauce over baked chicken breasts.

Because my own childhood did not include the broccoli trauma apparently experienced by many less fortunate souls, rarely a week of my adulthood has gone by without a bunch or two of broccoli making it into the grocery cart. These days, Scott and I practically eat it by the bushel, most often oven roasted after a drizzle of olive oil and a sprinkle of minced garlic.

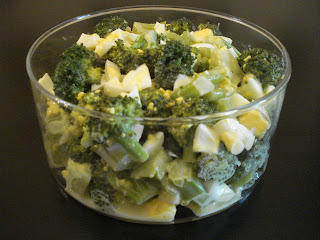
Not too long ago, however, wanting a make-ahead vegetable salad to serve with cheeseburgers for dinner, I suddenly recalled a broccoli salad recipe of my mother's, yet another way we had happily scarfed down broccoli as kids. A quick phone call confirmed my recollection of how to make the three ingredient dish and, since then, I have churned out more than one batch of this awesome chilled salad.


The salad, as noted, contains just three ingredients: broccoli, eggs and Marzetti brand slaw dressing. The broccoli is chopped into salad-size pieces, with the stem pieces separated from the pieces of the flower heads for cooking purposes (a simple but clever idea, since the flowers require less cooking time).


Starting with the stems, and then adding the flower pieces a few minutes later, the broccoli is quickly cooked until just crisp-tender and, once slightly cooled, tossed with the slaw dressing and chunky pieces of hardboiled eggs. The prep is also efficient: the eggs can be boiled while chopping the broccoli and then, while the broccoli cooks, the eggs can be peeled and chopped. It takes about twenty minutes to throw together, then a couple of hours to chill, and it could not be easier or more delicious.


Broccoli Salad
1 1/2 lbs. fresh broccoli, cut into large bite size pieces, and separated by stems and flowers
5 hardboiled eggs, peeled and chopped
approximately 3/4 cup Marzetti All Natural Slaw Dressing (we use the "lite" version)

Place pieces of broccoli stems in medium sized pot, cover with two to three inches of water. Bring water to a boil on high heat. Once boiling, cover and reduce heat to medium, and cook broccoli stems over a rapid simmer for about four minutes. Add chopped broccoli flower pieces, increase heat to high, returning water to boil. Once boiling, cook broccoli for about two more minutes, or until just fork tender (do not overcook). Drain broccoli in a large colander, and rinse with cold water to prevent further cooking. Place very well drained broccoli in a large container or bowl, add chopped hard boiled eggs, then pour slaw dressing over and mix gently to coat. (Note: use just enough dressing to lightly coat the broccoli and egg mixture, but do not drown it in dressing, as the mixture will become more liquid as the broccoli sits. If needed, additional dressing can always be added just prior to serving.) Cover and refrigerate for at least two hours before serving.

Tuesday, August 10, 2010

Dining room dilemma...resolved!

A recent post detailed my dining room decorating efforts, all of which turned out quite well, save and except the fact that, nearly five years later, the room lacks a table. While we made do for a long time with a folding table disguised reasonably well under a nice cloth, I hauled the "temporary" table out of there a month ago and swore that it was high time to acquire a proper table on which to dine.

The only drawback of my plan was going to be actually finding an appropriate table for the space. A traditionally-styled, formal dining room table was the last thing I wanted. To the contrary, my mind envisioned a table made of metal and wood, of a design just rustic enough to give it some character, but with clean and simple lines. In order to fit in the available space, the perfect table for our dining room needed to be narrower than most, but yet still be long and wide enough to comfortably seat six people. The table had to be reasonably priced and, to top off what I believed to be a rather tall order, the table would also have to mix and match well with the dining room chairs we already possessed.

Given these requirements, along with limited time to devote to scouring furniture stores or the Internet, I figured the odds of finding a table anytime soon were slim to none. Imagine my surprise when a Home Decorator's Collection catalog arrived in last week's mail and featured within its pages was a new line of dining room furniture. Like some sort of miracle arranged by the gods of home furnishings, one of the featured tables was absolutely perfect in style, size and price, and I wasted no time in placing an order online.

The new table has dark iron legs and a top of reclaimed antique wood in a deep honey finish that should go beautifully with our chairs, as well as the other details already found in the room. The slightly vintage, slightly contemporary design should perfectly complement the decor in the rest of our home, and will also perfectly suit our entertaining style. The only bad news is that the table will not be ready for shipment until early December. However, having gone five years without a real dining room table, this slight delay does not dampen my excitement in the least (although it may make serving Thanksgiving Dinner a bit of a problem).


Until the table arrives, I am content to look at the photos of it online, like the one above, and to dream happily about how great the table should look in our own space. If only all of life's little dilemmas, be they decorating or otherwise, could be resolved so easily!

Sunday, August 8, 2010

High on the hog

This weekend, Saturday afternoon found us gathering with a huge group of family and friends to celebrate the fortieth wedding anniversary of my cousin and his wife. It was a surprise party, hosted by the couple's children, and held outdoors at their home in the country across town from us.


The setting was lovely, the weather was perfect and the special occasion provided a fine reason to celebrate. Give this branch of my family any excuse for a party and they are on it! The same group also gathers every year for an outdoor swim on New Year's Day, after cutting a hole in the iced-over pond, but that's a whole other story. Another well established family tradition, and one that was part of yesterday's anniversary celebration, is roasting a pig. And, when it comes to pork, these folks know their business.


The process begins early in the day and the prepared hog is wrapped in chicken wire and placed on the large rotisserie-pole inside the giant roaster that was built years ago for this purpose. With the heat kept regulated to the correct temperature, the pig is slowly roasted over the course of several hours, until the meat is so tender that it would fall right off the bone if not for the chicken wire. When done, large sections of the hog are removed from the roaster one at a time, placed in large pans and then cut and shredded for immediate serving.

The end result of this long, hot and rather messy procedure is true pork perfection. Chunks of tender and juicy meat are coated with a crispy bark of caramelized skin and the flavors combine to make each and every forkful a delicious bite.

Accompanied by simple sides like boiled potatoes and onions, macaroni and cheese, and crispy fresh vegetables, the roasted pork makes for one awesome meal. We went back for seconds and actually found ourselves contemplating going back for thirds. Talk about hog heaven!

Thursday, August 5, 2010

Chicken. It's what's for dinner.

The start of this week found us launching a major cut-back when it came to our dining budget. As a result, yesterday's trip to the grocery involved selecting foods that were extremely cheap, yet still healthy, delicious and easy to prepare. One item that passed the test and made it into our cart was a three pound package of cut-up chicken pieces at $1.19 per pound.

Many moons ago, when I was a poverty-stricken law student and, for a few years after that, when I was a not-much-richer new lawyer, those big chunks of chicken (primarily dark meat that included skin and bones) were a regular grocery store purchase. Back then, the local discount supermarket routinely ran sales on ten pound bags of cut chicken parts for forty-nine cents a pound. At that price, it rivaled the cost of beans for a protein source and you can bet we ate alot of that chicken.

While such chicken is typically termed "fryer-parts" around here, it would take a gun to my head before I ever opted to fry chicken (or, for that matter, anything). Fortunately, I discovered early on that the chicken pieces cooked up beautifully in the oven and were also fantastic for grilling. Over time, though, an increasing income permitted me to forego the bags of budget chicken parts, and my chicken purchase of choice became the plump and juicy breast, sans bone and skin.

Not too long ago, however, I came across a recipe online that, along with the accompanying blog post and photos, definitely made me rethink my preference for boneless breasts of chicken. I marked the recipe in "Favorites" on my computer and then promptly forgot all about it, until our recent household budget crunch resulted in yesterday's purchase of that large package of chicken parts. Suddenly excited about the chance to be both fiscally responsible and prepare some totally awesome chicken, I pulled up the recipe and headed for the kitchen to make tonight's dinner.

Unfortunately, the realization quickly struck that the recipe called for shallots, which I did not possess and for which the new budget did not allow, and so I was immediately forced to make a substitution. That substitution caused another, and then another and then another. The preparation process ultimately ended with a pan of chicken ready for the oven that was drizzled in a marinade completely unlike the one described in the original recipe.


That's the bad news, if you can call it such.

The good news - make that the great news - is that the chicken turned out perfectly. "Perfect" is a term I rarely employ to describe my own cooking, but this dish completely qualifies for that description. The preparation prior to cooking took about three minutes to accomplish and, after a forty minute turn in the oven, out came the most succulent pieces of roasted chicken imaginable. The outside of the chicken was roasted to a gorgeous browned finish, and the inside was moist and juicy and infused with the fabulous flavor of the savory-sweet marinade I had thrown together. As Scott succinctly put it, "This is something I could eat every single night."


Perfect Roasted Chicken (adapted from Roast Chicken with Carmelized Shallots on davidlebovitz.com)

3 tablespoons garlic & chili extra virgin olive oil
3 tablespoons white vinegar
2 tablespoons soy sauce
2 teaspoons hot sauce
1 tablespoon honey
3 pounds chicken pieces (or a very small roaster, cut into 6 to 8 pieces, if you prefer to hack your own)
1/4 teaspoon salt
1 to 2 tablespoons minced garlic (to taste)

Preheat oven to 400 degrees. Arrange chicken, skin side up, in a shallow baking pan large enough to accommodate all the chicken. Mix together oil, vinegar, soy sauce, hot sauce and honey, then drizzle over chicken in pan. Sprinkle chicken with salt and minced garlic. Bake for 20 minutes. Pull chicken from oven and increase heat to 425 degrees. Turn all chicken pieces upside down in pan and return to oven. Bake for 20 more minutes. Pull pan from oven and flip chicken pieces so that skin-side is again up. If the tops of the chicken pieces need a slight browning to finish (and they probably will), turn oven to "broil" and, once oven is heated to a full 500 degree broil, return chicken to oven, a few inches away from broiler units, watching constantly, for 30 seconds to 1 minute, or until chicken is nicely browned. Serve immediately, and drizzle chicken pieces with marinade from pan for optimum flavor.

Tuesday, August 3, 2010

Food: dollars and sense


Over the last couple of years, there has been considerable attention given online (and even in the traditional press) to more than one blog focusing on the writer's goal to eat well, or subside at the very least, on far less money than one would ever think possible. The most extreme of these examples, like this one and that one, were experiments where the people involved documented their efforts to dine at the cost of one dollar per day.

While those websites make for fairly fascinating reading, they also make me want to pick up the phone and order a pizza, because the recurrent theme found amongst their pages is hunger. If one were to take the time necessary to read about such endeavors in detail, it would be learned that the participants ultimately found that their stomachs gradually adapted to less food and that the hunger pangs began to subside. Well, no kidding! I am sure that any poor stick thin, bloated-belly starving child in Ethiopia would be able to report the same thing, except in that instance, sadly, the starvation is not voluntarily induced.

On the other hand, I am well aware of the fact that Americans, for the most part, are gluttons. Our idea of portion size is completely distorted. Additionally, the sorry fact is that too many of us eat far too many meals out of a bag grabbed while on the go, and "cooking" too often involves heating up packages of precooked and/or overly-processed foods, be they from a box or frozen. While the economy has been disastrous in the last couple of years, one would never know it by cruising past most any locale's assortment of chain restaurants on any given night. Aside from the lack of good nutrition and the increasingly far ranging obesity that stems from such trends, the reality is that these types of eating habits are terribly expensive.

In terms of our own routine, while Scott and I are far from perfect, I would objectively have to say that we do better than average when it comes to eating habits and, more to the point here, eating expense. Unless we use a gift card given to us for some special occasion, I can count on one hand the times we eat out per year at a restaurant when not traveling. Our absolute worst vice is carryout pizza, and I will readily admit that we also occasionally give in to a late night Taco Bell or Burger King craving. Overall, though, we eat fairly healthily, and also fairly inexpensively (acknowledging that "inexpensive" is a term that's certainly relative to income level).

But there's always room for improvement. Because my recent mid-year budget review showed that we were doing pretty well, but not perfectly, when it came to meeting the financial goals set at the year's beginning, I began to look for ways to tighten the purse strings. Among other things, our food budget was one area in which I decided we could cut back.

From a review of my records, I know that we eat extremely well (sometimes overly well) on the approximately seventy-five to one hundred dollars per week that we routinely spend on food and drink.

To the extremely frugal, that may seem like an outrageous expenditure. At the other end of the spectrum, we know many couples at our general level of income - or lower, for that matter - who regularly drop forty bucks in a restaurant a couple of nights weekly, and co-workers abound who do not blink at spending at least five dollars per day on lunch during the work week. We fall in between the two extremes, in the category of persons who enjoy good food and cooking and, while we don't eat out much, we do tend to spend a good chunk of change at the grocery store on fresh produce, quality cuts of meat, expensive fish and seafood, and specialty ingredients for recipes we want to try.

In any event, without doing any real analysis in advance, I am hoping that we can reduce our food budget by twenty-five to fifty dollars each week. Doing the math, our new target budget will fall between fifty to seventy-five dollars per week, meaning that the two of us will have to share an average daily food budget of $7.14 to $10.71. (To be entirely clear, by "food budget", I am in fact referring to all meals, each and every day, not just to food we buy to eat at home.) Slicing that extra twenty-five to fifty bucks a week will put lots of extra dollars in our pockets (or our savings account), and trimming the fat from our food budget may also help trim a little fat from our waistlines.

And, so, with the start of a new month two days ago, our own experiment began.

Bringing up the rear...Part II

The first installment of this tale described the pitiful lack of landscaping at the rear of our home, along with several other challenges presented by our backyard space, as well as our plans to make some much needed improvements. (The following "before" photo depicts part of the problem area.)


I am now, however, able to report that the work has begun. This past weekend was a long one, involving some serious labor on our part. We tilled up huge areas of grass and dirt, moved loads and loads of topsoil, built a thirty-foot long bed edged by landscape timbers, planted thirteen new shrubs and twenty-seven English ivy plants, and then had the fun of hauling and spreading a giant pile of mulch. Suffice it to say that we now quite clearly understand why they call it "sweat equity."

While the process was tedious, the intial improvements were completed by Sunday and the change is already fairly remarkable. Feel free to compare the look of the bare fence, above, with the way it looks now that a tidy bed of yews has been planted alongside. Behind the row of yews (or Taxus, if you prefer the Latin) are the starts of English ivy that, in time, will climb the fence and serve to disguise its hideous appearance.


Similarly, we are tickled with the difference made along the back of the garage through the installation of shutters on the windows and the addition of a wide bed of boxwoods in front of the brick wainscoting, also evidenced by a comparison of the "before" photo above with the one that follows.


While it would be nice to rest on our laurels, these changes are just the tip of the iceberg in terms of those still to be made. We next need to attack the dirt and weed patch that exists at the back of the house's other end, shown below.


Our intent there is to install a wide expanse of flagstone, a terrace of sorts, that will be both dog and people friendly. We also need to camouflage the ancient air conditioning unit (or, seeing as it does not work, perhaps actually replace it!), and then find a way to beautify the ugly little well casing that sticks up right in the middle of the area.

It will take some doing, and it won't happen overnight. Nonetheless, I look forward to seeing the results and to writing about them here. Stay tuned for the next installment of this saga...